
May
I’m shooting a video for my apartment on Monday and I get to talk about all the renovations that I did in my apartment (on a budget) as well as all the DIY projects I’ve done to make my space unique.
That of course led me to try to pick a favourite DIY.
Is it the woven hanging above my couch? Maybe but it’s a little wonky in places so not my best work.
Maybe it’s my Gold & Blush Painted Door? Possibly. That one is pretty far up there and I still love it after 5 years.
Or maybe it’s my mid-century modern chair that I painstakingly reupholstered in green velvet? That project was quite the labour of love but yielded great results.
However, when I think about successful DIY projects, they’re the projects that are easy, fairly inexpensive, fun to do and have a huge payoff in terms of how gorgeous they look.
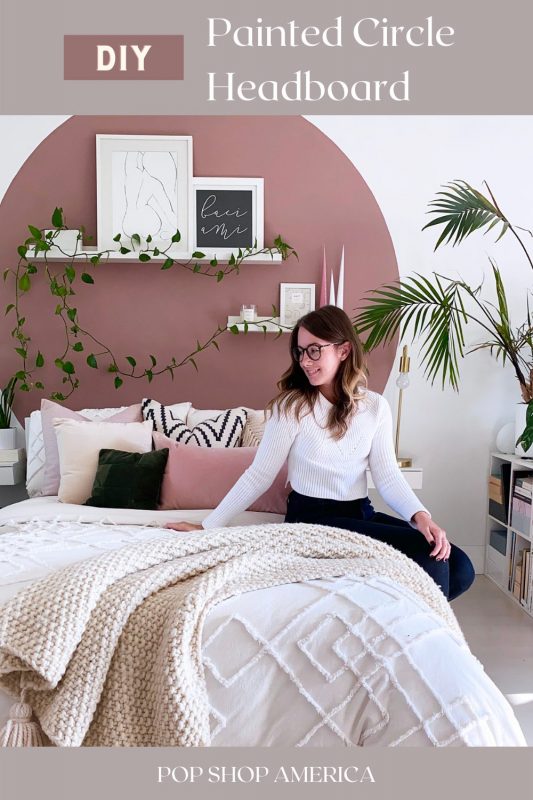
Keeping that in mind, I had to choose my latest painted circle headboard DIY as my favourite.
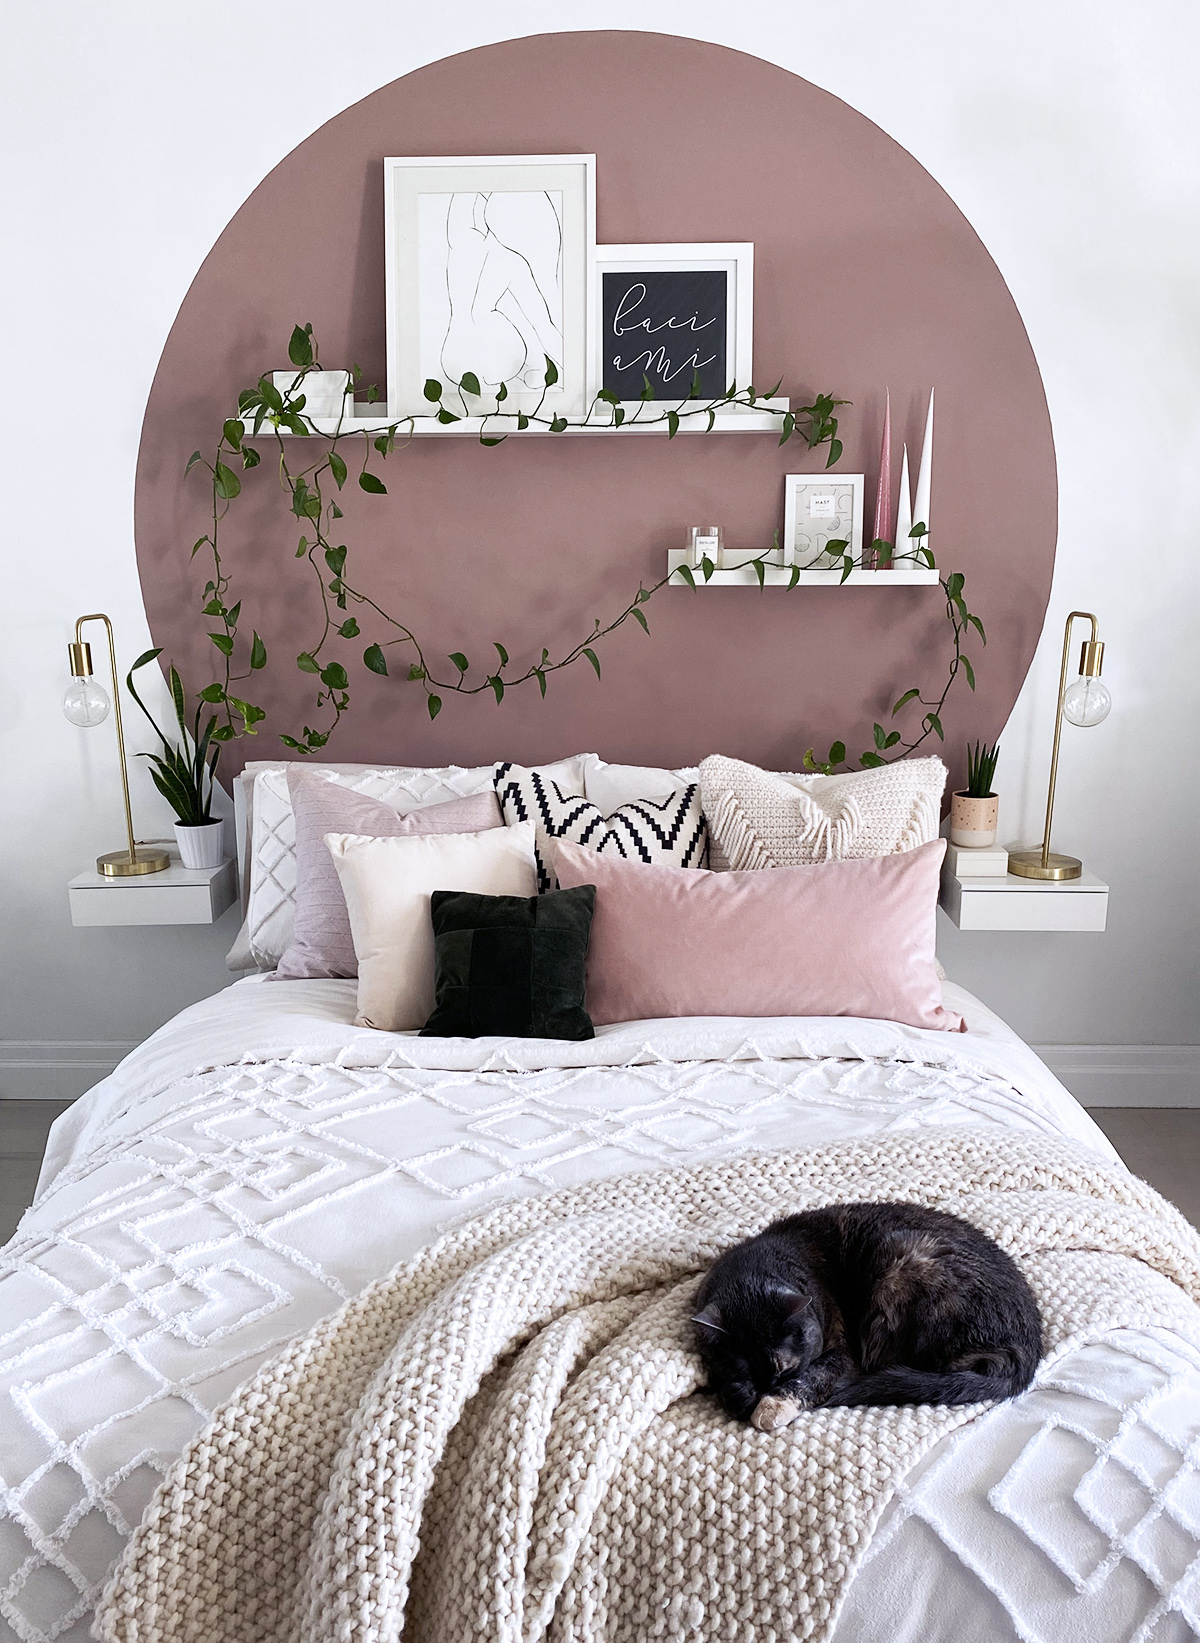
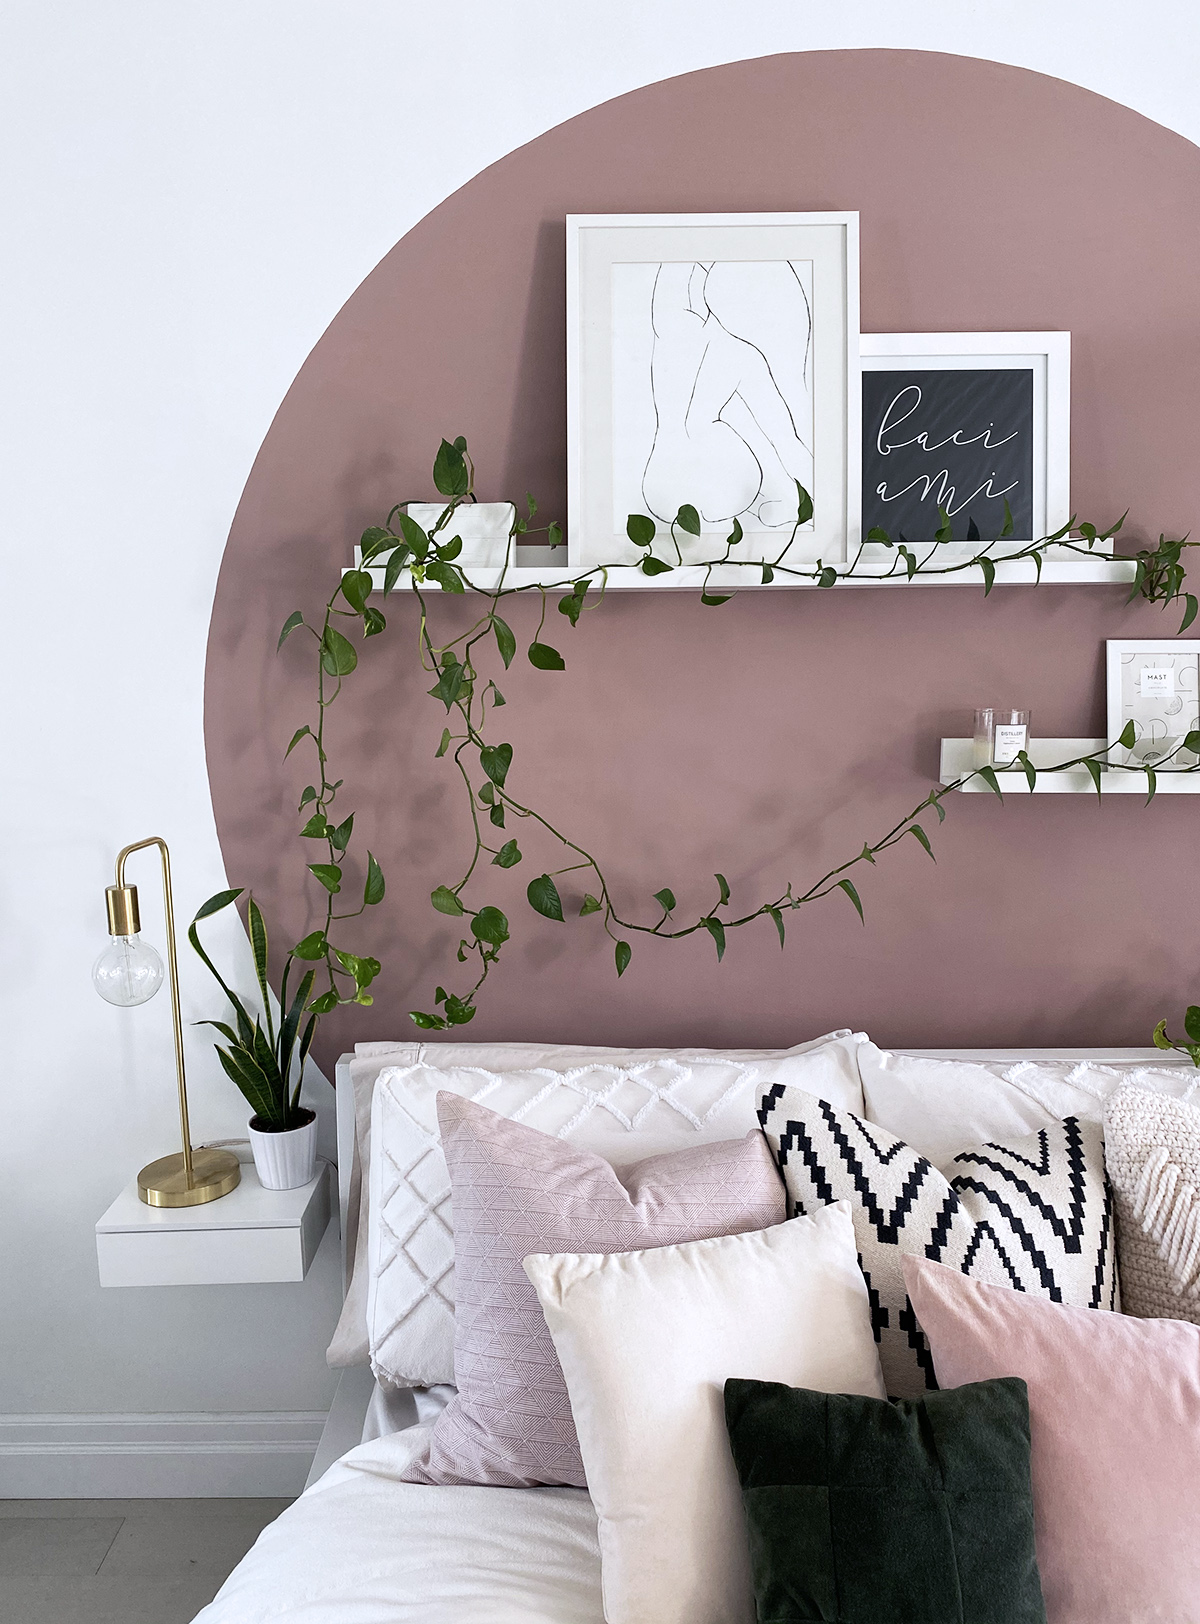
It cost me literally no money as I got the paint from work and really only took about 4 hours of my time. There was only a small amount of annoyance when drawing the circle so the labour wasn’t too bad. Plus, the payoff is HUGE! It makes such a big impact in my small space and really helps to accentuate the floating shelves that I have. Before there was a lot of white above my bed and I think the dusty pink circle really helps to make them pop and gives the space a more finished look overall. This is the before when I had just finished my bedroom area:

As I scrolled on Pinterest, I kept seeing people painting different shapes around their homes. I liked some of them but wasn’t too fond of others. That is until I saw people painting archways. I thought they looked so cool and almost had a trompe l’oeil effect in some situations. Such a cool almost architectural detail – and done using only paint!
After a bit more research, I stumbled upon a pin where someone had painted a pale pink circle over their headboard and once I saw that there was no going back.
Over the labour day long weekend, I set about to finishing up all kinds of projects in my apartment (that’s now done!) and added this painted circle to the list.
The colour that I chose is sulking room by Farrow & Ball and it’s a lovely rich, dusty pink. I decided on this colour because it goes within the colour palette of my apartment, but it was bolder than any other colour I had in the apartment so it would provide some contrast.
So, if you find yourself with some time over the weekend and want to do a quick, gorgeous DIY project I highly recommend!
For the purpose of this tutorial, I’ll take you through how to make a headboard out of your circle, but the same technique can be used in different places around the home. It might even be easier for you if you don’t have to find the centre in between your bedside tables!
DIY Painted Circle Headboard
Supplies:
– about 1/2 quart paint colour of your choice (I used Sulking Room by Farrow & Ball in a matte finish)
– a small paintbrush
– a paint roller & tray
– a screw & screwdriver
– drywall compound
– putty knife
– 3-4 feet of string (ideally string that has no stretch)
– a pencil crayon in a colour similar to your paint colour
– patience
Method:
1. Start by roughly marking how high and how wide you’d like your circle to be. For me, that meant roughly marking how much I wanted the circle to extend past the width of my bed and how high I wanted it to extend past the pictures I have on a shelf above my bed. Then pull your bed away from the wall and remove anything hanging on the wall where you’ll be painting. Patch and sand any holes in the wall and wipe it down with a dry cloth after to remove any dust.
2. Next, we’re going to take some actual measurements. First, measure how wide your bed is and then measure the distance from one side of your bed to the rough mark you made on the wall. For example, my bed is about 54″ and the rough marks I made from the side of the bed extend another 8″ out on each side so I knew that I wanted my circle to be 70″ in diameter.
3. Next, I found the centre point of my headboard and made a mark on the wall to indicate the horizontal centre. My nightstands are screwed into the wall so I had to try to make sure that the bed was perfectly centred in between them when I measured. Even if your nightstands can move, you’ll most likely want to do this too as I’m assuming your bed is already in the space you want it to be and you don’t want to accidentally have to shift everything to accommodate the circle.
4. For me, I have shelves that hang above my bed with art on them and I wanted to make sure that the circle would extend past the art as well. Because I estimated that I wanted the circle to be 70″ in diameter I took my measuring tape and lined it up with the mark I made on the wall to indicate horizontal centre and from there measured 35″ vertically. I moved my measuring tape up the wall (keeping it centred) until the top of the measuring tape hit the rough mark I made above my art. Once I found that point I made a large “X” which became the true centre of my circle. Lastly, I roughly measured what the arc of the circle would look like by measuring out 35″ from the true centre in all directions just to make sure that it wasn’t hitting the nightstands.
5. Next, you’re going to take a screw and screw it into the wall where you marked your X in the centre, leaving about 1/2″ of the screw out of the wall. Take your string and tie it onto the screw, making sure that the knot is very tight. Then measure your string so that it’s half the diameter of your circle, pulling the string very taught. In my case, that was 35″. Loosely tie your pencil crayon to that string and then measure again, adjusting as needed until your string measures the radius that you need. Once you’ve got the correct radius with your string taught secure the pencil crayon tightly.
6. Now comes the tricky part. Starting at the bottom of your circle (which you presumably won’t see it because it’ll be behind your bed) pull the string taught and hold the pencil crayon at a right angle to the wall. Lightly make a small line. Keep moving your pencil crayon around the circle just making small marks until you’ve made a dashed line all the way around. Take your time as you do this and make sure to keep the string taught and the pencil crayon at 90 degrees to get the most accurate circle.
7. Once you’ve made all your marks, VERY SLOWLY, and I mean VERY SLOWLY start to trace small arcs of your circle by connecting a few marks at a time going all the way around the circle. Ideally, if you took the time to keep a taught string and a 90-degree angle in your pencil crayon, you should have a perfect circle.

8. Take a step back and assess if you need to make any edits. Hopefully, you took your time and it’s all even! If you’re happy with your circle, now is the time to remove the screw and patch the wall. The drywall compound will dry while we’re painting the outline of the circle.
9. For the next step, we’re going to be moving very slowly again. Take your paintbrush and start to paint the outline of the circle. I did this by painting very small strokes at a time. I painted my outline about an inch thick so that I could get the roller right up to the outline without missing any spots. This is also slow, steady work, but the more patience you have while doing this, the more crisp your line will be. Don’t let this eat at you though if it’s not perfect. As long as it’s quite close, you’ll be good. This is the kind of project that’s appreciated from far away. I can almost guarantee that no one is going to walk right up to the wall to see how crisp your lines are!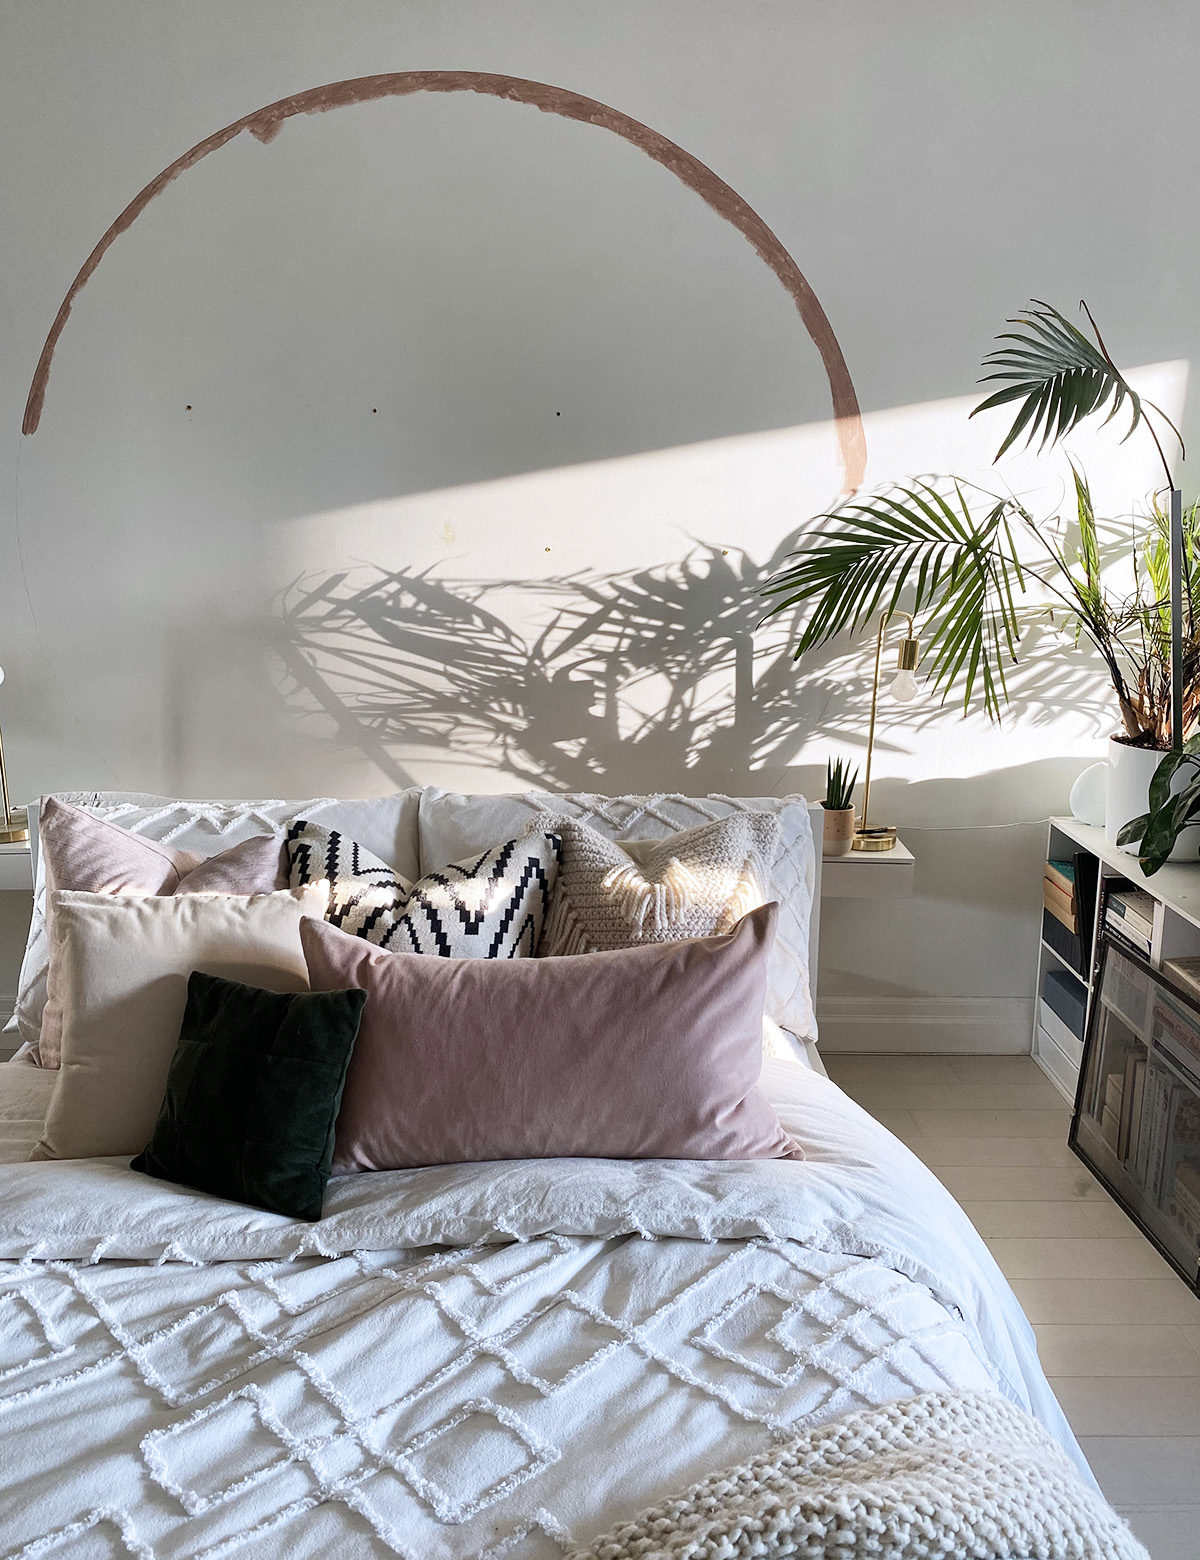
10. Once you’ve painted your outline, check to see if your drywall compound is dry. If so, give it a quick sanding and we’re ready to paint!
11. Using your roller, carefully paint the entire inside of the circle. I removed shelving that I intended on hanging back up later so I just painted very close to those holes in the wall and not directly over them.
12. Repeat the outline and filling in process until your circle looks a solid colour. I had to do 3 coats of paint.
13. Once you’re done painting, give the paint a solid 24 hours to fully dry and then feel free to hang anything within your circle or leave it as is for a simple, but beautiful headboard!

As I said, this has been one of my favourite DIY projects to date and I sincerely hope you’ll try it for yourself so you can fall in love as I did! To be honest, I love the headboard but I think the pothos really helps to bring this whole look together!
There was actually a weird random green square painted over the bed when we bought the condo and I have to say, I like this geometric shape much better!
I’d love to know what you think of this DIY and if you have any questions or comments about how to complete this, please feel free to leave a comment!
xo, Tess.
Let’s Stay Friends!
Insta | Pinterest | Enews | TikTok


I am so inspired by this idea and the exact color!
Where is your bedspread/comforter from?
I’m not sure if it’s available anymore but I did find some similar ones by searching for “Tufted Comforter”
Like this —-> https://amzn.to/3OtBIgc